How to Setup Your VPN on Chromecast
date
Mar 24, 2022
slug
how-to-setup-your-vpn-on-chromecast
status
Published
summary
Setting up a VPN on Chromecast might be tricky for some internet users. This article explains the 4 ways to set up Chromecast VPN. Learn how to set up a VPN on Chromecast.
tags
Website
type
Post
featured_image_url
Author
Berktug Mutlu
category
Vpn
meta_title
How to Setup Your VPN on Chromecast - FastVPN
If you own a Chromecast, you already know it is a convenient tool for binge-watching some TV. However, unlike some other Android-based devices, it’s a bit picky with geo-blocked content. Thankfully, we have this guide on setting up your VPN on Chromecast to help you out.
Can You Install A VPN Client On Chromecast?Four Ways To Setup a Chromecast VPNOption #1: Installing on Your Physical RouterOption #2: Establishing a Windows PC Virtual RouterSetting Up Your Router Via Command PromptOption #3: Setting Up a Mac Virtual RouterOption #4: Getting a Virtual Router on LinuxThe Benefits of Securing Your Chromecast Via VPNConclusion – Is Having a Chromecast VPN Worth It?Chromecast VPN FAQsHow Do You Use Chromecast?What is a Virtual Router?Why Does Chromecast Not Allow VPNs?Can I Use a Free VPN With My Chromecast?Will Using a VPN on My Mobile Device Help?
Can You Install A VPN Client On Chromecast?
First and foremost, you already know how installing a client can circumvent some smart TVs and devices. However, Chromecast doesn’t allow you to install a VPN client. Instead, it would be best if you had a virtual or physical router to establish your VPN. Below, we will teach you how to install a VPN connection on both physical and virtual routers.
Four Ways To Setup a Chromecast VPN
Option #1: Installing on Your Physical Router
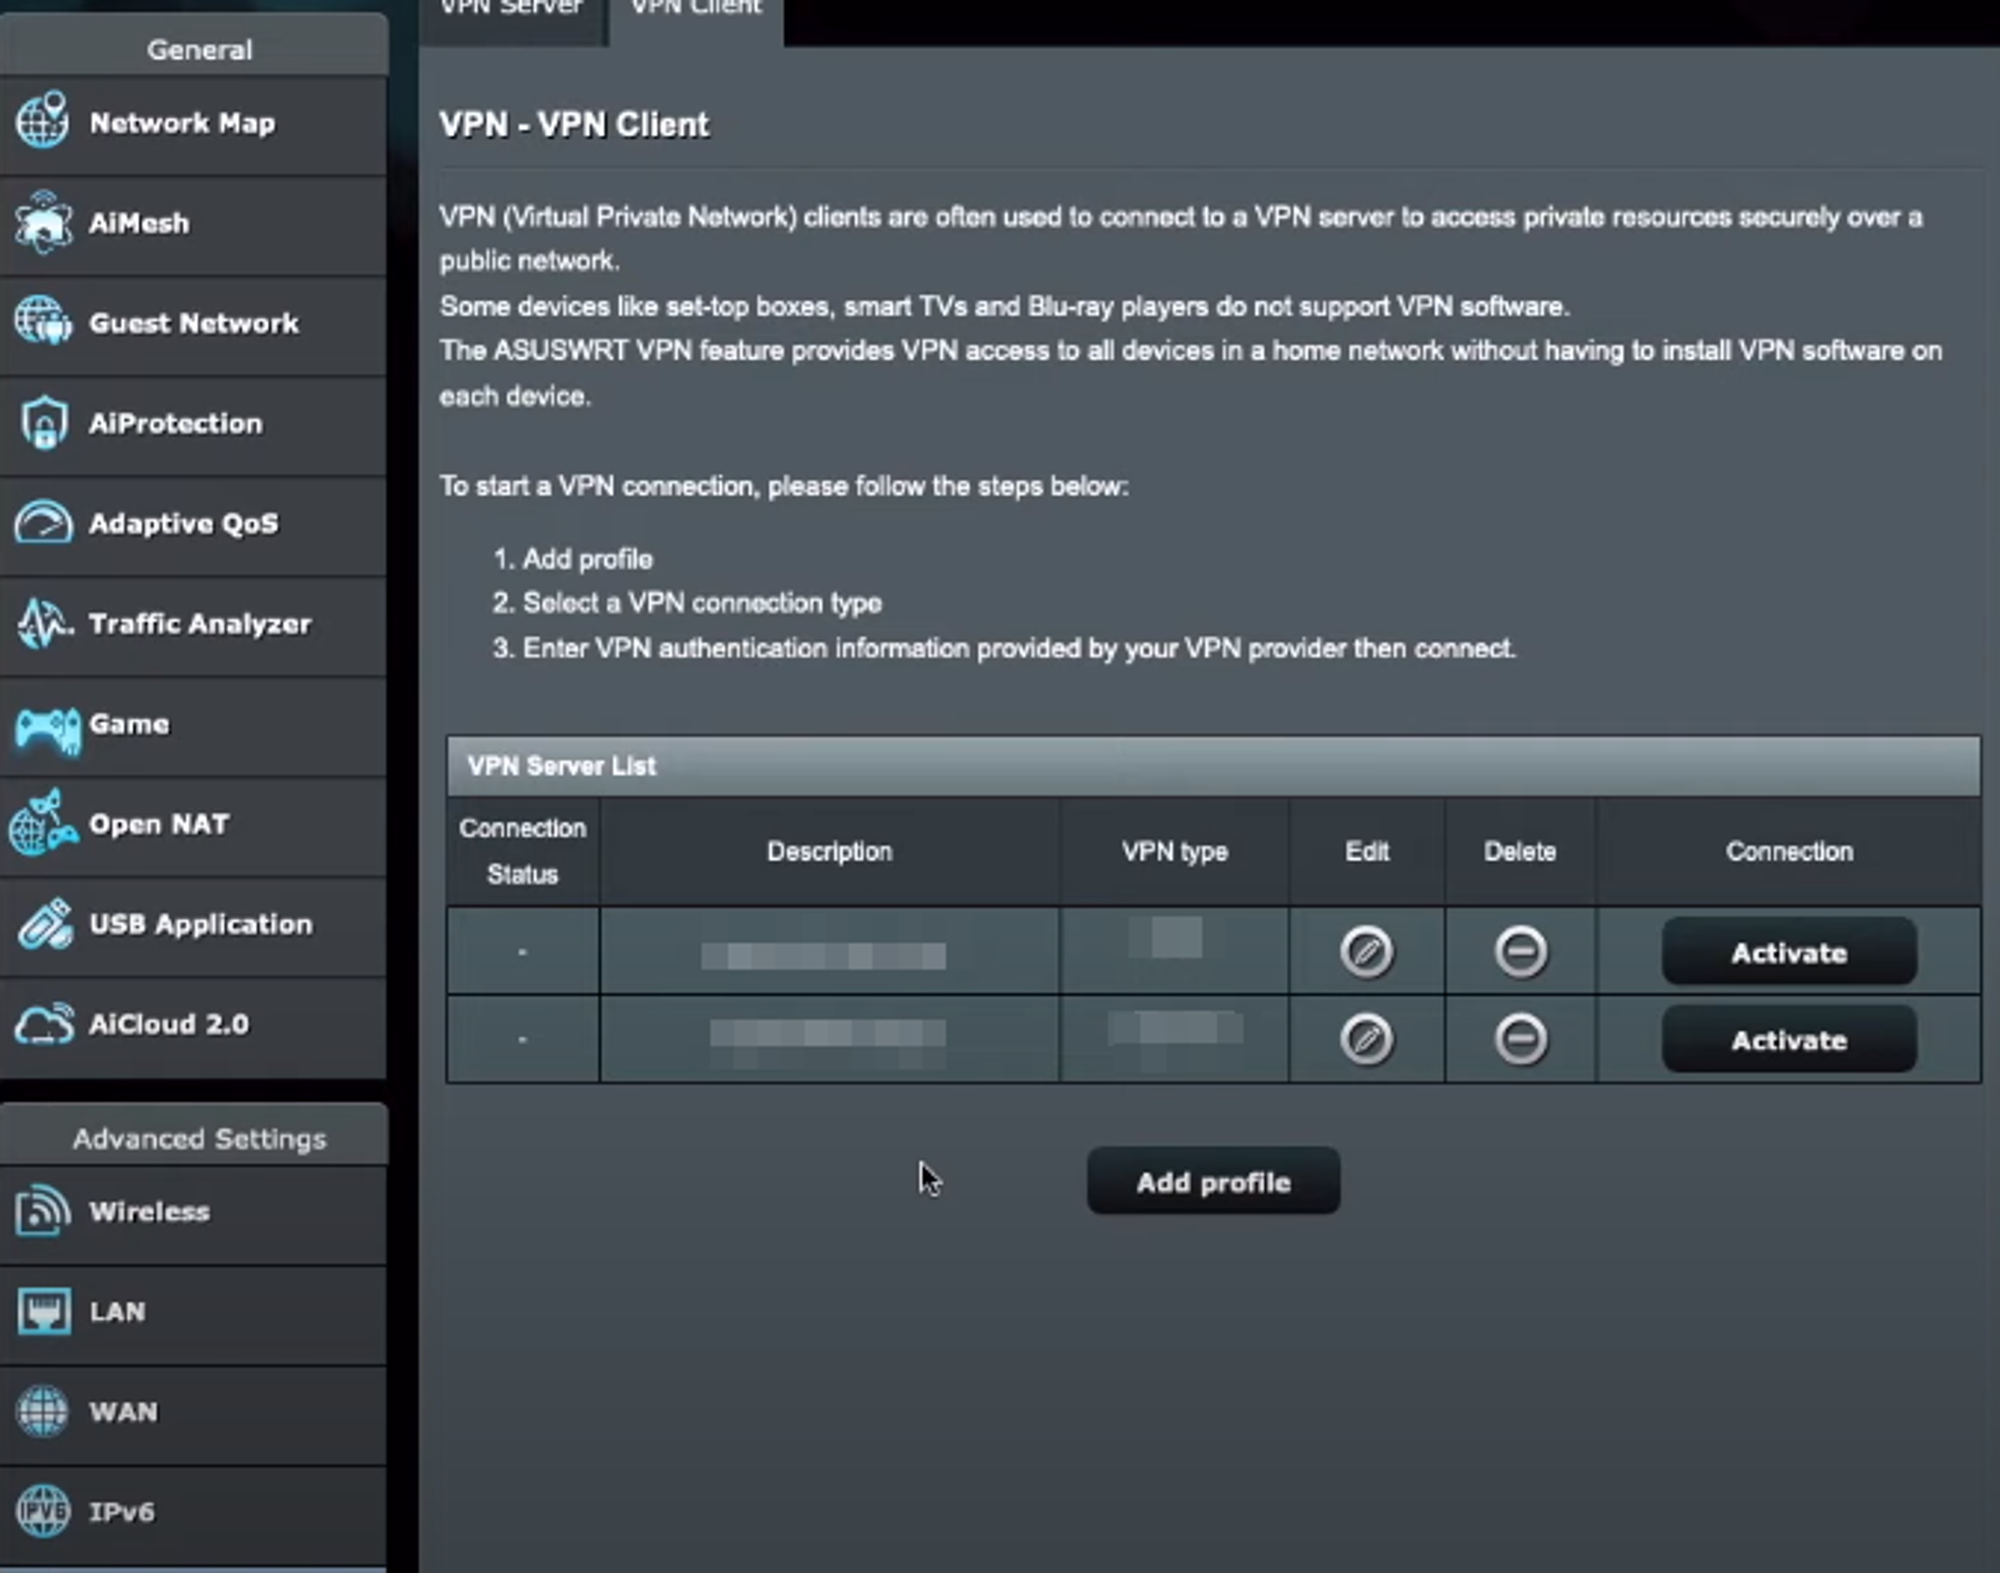
To install a VPN on your physical router, you need to start with these items:
- You need a VPN client with router support
- Third-party firmware compatible with your router
OR
- A VPN router built to support those connection types
Once you get all of the above items collected, you can follow these steps:
- Download third-party firmware you can find on the DD-WRT website
- Log in and access your router’s admin console
- Go to the area of your router that mentions “router update.”
- Upload the firmware file after clicking “browse” on the update page
- Wait for a few minutes for the installation to complete
- Once the update is done, power cycle it by unplugging it for about thirty seconds
- Power the router up again, and you should see a new screen
- Go to the VPN tab under the navigation settings (scroll down a bit)
- Go to your VPN website and download the router file (typically found in OVPN format)
- Upload the file (or manually enter your login credentials and the server details found on your VPN’s router connection page)
- Click on “add profile” or “submit” (changes depending on your router’s firmware)
- You should see an “activate” button next to the new VPN connection.
Clicking the activate button should turn on your VPN. You should also run an IP test to determine whether you have any leaks.
Run the test from multiple devices as well. When running the test on smartphones, be sure you aren’t connected to mobile data.
Of course, not all routers are compatible with VPNs. In these cases, you’ll need to establish a virtual router.
Option #2: Establishing a Windows PC Virtual Router
In cases where your router is incompatible with DD-WRT or Tomato (another third-party router firmware), you’ll need to establish a virtual router. A virtual router is a software-based version of your hardware router.
Virtual routers convert whatever PC you are using into a router. As a result, all of your computer’s connections will route through the PC. This feature eliminates the need to buy a new router and means you will need to take up quite a bit of your computer’s working space to keep the “router” running.
Here is some virtual router software you should consider:
- Virtual Router 1.0 (for older Windows machines)
If you don’t want to download software, you can establish a router via command prompt. Follow these steps to set it up:
Setting Up Your Router Via Command Prompt
- Open command prompt by searching for it in your programs
- Type “netsh wlan show drivers” and press enter
- Find “Hosted network supported : Yes” (if it is “no,” you won’t be able to use these steps)
- Type “netsh wlan set hostednetwork mode=allow ssid=(insert name of network) key=(insert password)” and press enter
- Type “netsh wlan start hostednetwork” and press enter
- Open your list of networks under the control panel’s “network & internet” page
- you should see an ethernet connection referencing your Windows Adapter.
- Right-click on it, select “properties,” and check the box next to allowing other users to connect through this internet connection.
- Open your VPN client and check if the protocol is OpenVPN (other types of protocol aren’t usually compatible)
When allowing other users to connect to you for the internet, you’ll need to ensure that the devices are connected via LAN (Local Area Network) or have a wireless hotspot engaged. You can include wireless connections here:
- Go to “network & internet.”
- Choose “share my internet connection from” and choose WiFi
- Enter the wireless network name and password
- Turn on your mobile hotspot
Double-check all of your devices to be sure that they are connecting through the wired/wireless “router.” Make sure to name it something unique to be sure you route connections through your computer.
You can sometimes use this as a substitute for your regular router. However, cable-based broadband connections will still require a compatible router.
Option #3: Setting Up a Mac Virtual Router
If you have a Mac device, you’ll find these instructions similar to setting up your VPN on any Apple device. The difference is that you’ll want to add the step to share the connection with other devices on the network. You can do so with these steps:
- Either install a VPN client or manually set up a VPN
- Make sure that the connection is active on your network list
- Go to “Sharing” under your Mac settings
- Click on internet sharing
- Select your VPN under the “share your connection from.”
- Select “WiFi” and “Ethernet Adapter” under the menu below this
- Under this menu, select “WiFi Options…”
- Enter your username and password
- Make sure the box next to “Internet Sharing” is clicked
Because this is sharing your VPN connection, you’ll see a new network on the list. You’ll need to go through the complete list of network devices from your router to move them over.
Because Macs are a bit easier when it comes to setting this up, there isn’t much software for managing it. Just be sure that your VPN stays on, or it eliminates the purpose of creating your fake router.
Option #4: Getting a Virtual Router on Linux
Linux routers are incredibly commonplace, making establishing this system more manageable than you might think. To establish your virtual router, you need to follow these steps:
- Open Terminal
- Enter “sudo add-apt-repository ppa:lakinduakaash/lwh” and hit enter
- Input “sudo apt-get update”
- Enter “sudo apt-get install linux-wifi-hotspot”
- You will find it on your application list
- Make sure you have a VPN client installed and active.
For establishing ethernet connections, you can follow the instructions through this video:
https://youtube.com/watch?v=f51Vzd8g2oE
The Benefits of Securing Your Chromecast Via VPN
When it comes to leveraging a VPN provider for Google Chromecast, there are a few benefits:
- Good VPN services help you overcome geo-blocked content that you usually would not be able to view in your country.
- You can use streaming services in privacy, ensuring nobody can steal your data while watching movies or television.
- Some internet service providers throttle your data based on your location. Those who stream videos often are prominent targets of data throttling.
- Securing your router has added benefits for all of your network users. This ensures your entire family will be protected (even those not using Chromecast).
Conclusion – Is Having a Chromecast VPN Worth It?
Google is one of the foremost collectors of personal data. As a result, you should ideally stick to using other platforms. However, there is no doubt that having a Chromecast is a neat part of streaming.
To ensure you remain secure on your Chromecast, always have your VPN on. Also, avoid putting any personal information on your Google account.
We hope this Chromecast setup guide helps you during your binge-watching. For more security tips, check out this list of the most common ways to fix VPN problems.
Chromecast VPN FAQs
How Do You Use Chromecast?
Most video streaming platforms have a TV-like icon with a WiFI signal coming out of it. This indicates that you can connect to an existing Chromecast on the network.
What is a Virtual Router?
A virtual router (vRouter) is software that duplicates how a router works. Virtual routers have the added advantage of supporting multiple networks. Most physical routers require unique software to match these capabilities.
Why Does Chromecast Not Allow VPNs?
Chromecast enables you to connect to streaming services but has no way of storing applications or data. Despite Android systems having the ability to support VPNs, Chromecast is one of the few Android systems that doesn’t allow your connection.
Can I Use a Free VPN With My Chromecast?
Yes, you can, but be wary about using a free VPN. Most free versions of VPNs often use this platform to gather user data. Some companies sell this data to third parties to make money using your information.
Will Using a VPN on My Mobile Device Help?
No, the Chromecast connects directly to your router’s WiFI, meaning having a VPN on your mobile device doesn’t help. As soon as your Chromecast activates, it will use whatever location is found. That means if your mobile phone and Chromecast show different places, you’ll most likely run into an error.