Three Secure and Easy Ways To Set Up a VPN on Apple TV

date
Apr 7, 2022
slug
set-up-vpn-on-apple-tv
status
Published
summary
Owning an Apple TV can be a great way to connect to your favorite TV service. Whether you use Netflix, Hulu, or Apple’s newly minted streaming service, it’s easy to watch whatever you want with little to no interruptions. But for those who enjoy international exposure, you might want to know how to set up a VPN on Apple TV.
tags
Website
type
Post
featured_image_url
Author
Berktug Mutlu
category
Internet Tips
meta_title
Three Secure and Easy Ways To Set Up a VPN on Apple TV - FastVPN
Owning an Apple TV can be a great way to connect to your favorite TV service. Whether you use Netflix, Hulu, or Apple’s newly minted streaming service, it’s easy to watch whatever you want with little to no interruptions. But for those who enjoy international exposure, you might want to know how to set up a VPN on Apple TV.
Below, we will go through three of the most popular methods you can use to establish a VPN for this unique device. If you don’t own the box (but you do have the streaming service), we will also let you know how to set up your VPN for those situations.
What is an Apple TV?Why Do You Want a VPN for Apple TV?Three Methods for Setting Up Your VPN for Apple TVMethod #1: Using a Manual DNS SetupHow to Change to a Manual DNS in Apple TVHow To Change Your Region on Apple TVMethod #2: Installation on Your RouterInstalling an OVPN File On Your RouterHow To Flash Your RouterMethod #3: Using a Virtual RouterSetting Up a Virtual Router Through Wireless Connection for Apple TVSetting Up a Virtual Router for Wired Apple TVWhat To Keep In Mind With Virtual RoutersEncrypting the Connection of Apple TV+Method #1: Setting Up a Manual VPN ConnectionMethod #2: Downloading a VPN ClientConclusion – Why Do I Need A VPN For Apple TV?Apple TV VPN FAQsCan You Download a VPN on Your Apple TV?Will VPNs Slow Down Streaming on My Apple TV?Is Apple TV+ The Same as Apple TV?Will Using a VPN on Apple TV Work for Other Streaming Services?
What is an Apple TV?
An Apple TV is Apple’s alternative to the Roku. So it is a streaming box with support for multiple streaming services. You can use this unique TV box if you have a power source and an open HDMI port.
People prefer streaming services because they are a massive improvement over old-fashioned services. You had to wait for specific time slots for your favorite program back in the day. These days, it has gotten better in a few ways. However, there are some drawbacks to streaming services that VPNs can solve.
Why Do You Want a VPN for Apple TV?

A VPN, or virtual private network, provides security by hiding your location and connection data from those who usually access it. In the case of Apple TV usage, you have one of two reasons for VPN usage while accessing Apple TV:
- It protects your connection and traffic data through encryption, which is something Apple can use to target you with advertising
- You can access another country’s version of streaming services
While I can’t recommend you violate any service’s Terms of Service, there is no doubt that streaming services have become very segmented. In some cases, you need to pay for two separate services to access the complete set of programming.
For example, Criminal Minds fans will need to subscribe to Netflix and Paramount+ (assuming you live in the United States) to access the complete series. This segmentation of television programming can be frustrating to people with limited budgets, which is a marketing ploy to get you to buy the other half of streaming services.
However, this situation is specific to those living in certain regions. If you were from the United Kingdom, you might not have to subscribe to multiple services (or vice versa).
Because most streaming services do not outright block VPNs, it’s technically not against most of their TOS. So there are plenty of reasons for you to use VPNs to save a bit of money on your streaming budget.
Three Methods for Setting Up Your VPN for Apple TV
There are three popular methods if you want to encrypt the connection of your Apple TV device:
- Smart DNS (Manually)
- Router
- Virtual router
Below are the steps necessary to establish all three connections:
Method #1: Using a Manual DNS Setup
The DNS setup method requires getting a DNS server IP from your VPN provider. Some VPN providers have a list of these DNS servers available on a login dashboard. Otherwise, you’ll need to contact customer support.
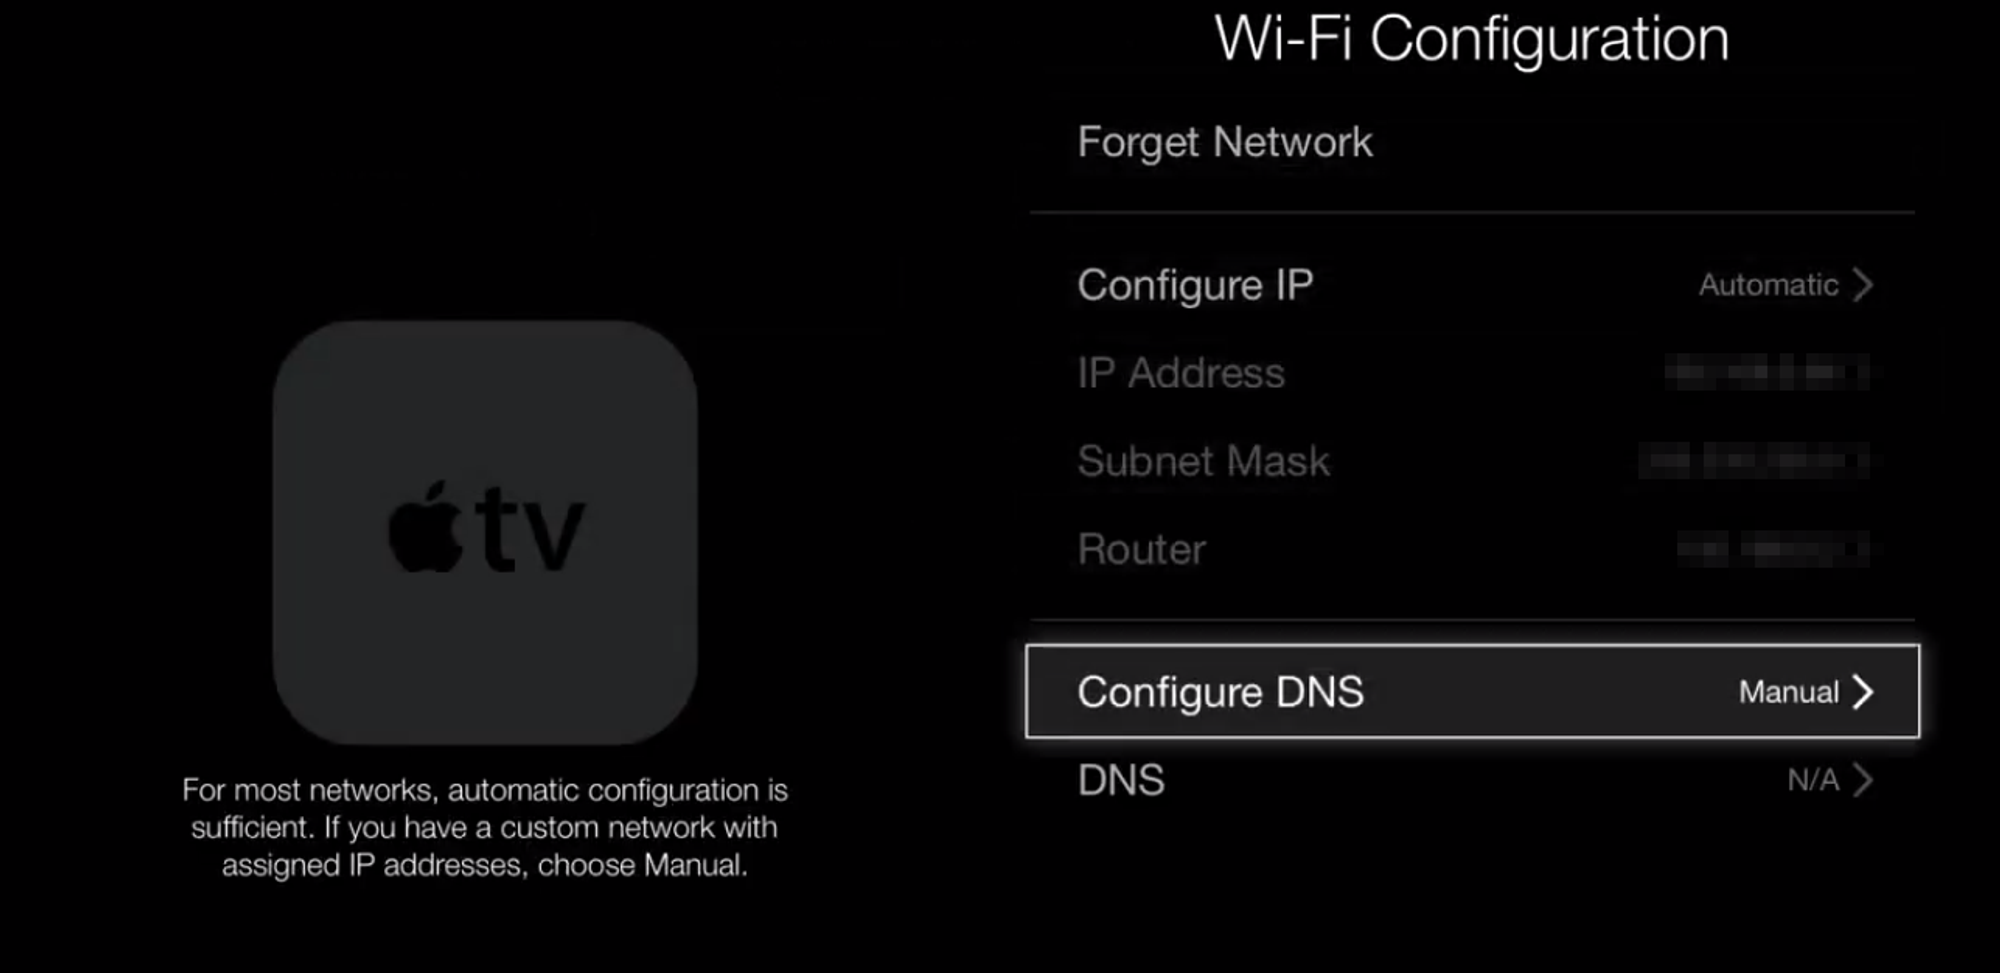
To start, you’ll need to change your Apple TV’s settings for a manual DNS configuration. Here is how you can do this:
How to Change to a Manual DNS in Apple TV
- Go to “settings” on your Apple TV
- Select your connection details (WiFi or wired)
- Select Configure DNS and change it to “Manual.”
By establishing this, your streaming service will go through the DNS server of your country. If it still doesn’t work, you might need to change your Apple TV’s region. Here are some additional steps for that:
How To Change Your Region on Apple TV
- Go to “settings” and select “general.”
- Under Apple TV Language, find “region”
- Change your region so it matches your VPN’s region
Be aware that Apple TV does not support all available locations. So if you are trying to spoof TV in an area where Apple doesn’t offer services, this might not work.
If you travel and bring your TV, this is an excellent method to keep up to date on shows from your home. However, if you are already using your home network, using a Smart DNS system can be somewhat inefficient.
To address this inefficiency, below are two other options that apply to your entire home network.
Method #2: Installation on Your Router
Home networks can reap multiple benefits from installing a VPN on their router. We’ve got an incredibly detailed guide to VPN router installation here. If you don’t feel like reading the detailed guide, we’ve got the short version for you.
To start, you’ll need a VPN router (or a router that supports VPNs). If you buy a VPN router, you won’t need to replace the current firmware. Instead, it will come with the capabilities to install a VPN for you.
You’ll need to start by gaining your VPN’s server name and details. You can do this through one of two means:
- Contact your VPN’s customer service team to see if they support the protocol necessary to connect through routers (and get the login details for your router from them)
- Access your dashboard to see if you can’t find the router details
OR
- Download the OVPN file that contains all this information for you.
Typically, the information you need is limited to a router-based username, password, and server name. Server names usually change based on location or need (a sever that routes you to the fastest site), so specify your needs if contacting customer service.
If you are given an OVPN file, here’s how you use it:
Installing an OVPN File On Your Router
- Go to VPN under your router’s advanced settings
- Select browse under any file upload subheading
- Upload the OVPN file
- (optional) power cycle your router
- You should see the VPN server on your list
OVPN files contain all the data you would typically enter manually. So in cases where there is no OVPN file, you need to enter the details after clicking on “add server.”
In cases where you do not have a VPN heading under your advanced settings, you will need to flash your router. Here are some steps for that:
How To Flash Your Router
- Go to DD-WRT to see if your router is available on their database.
- Download the router matching your make and model (be exact!)
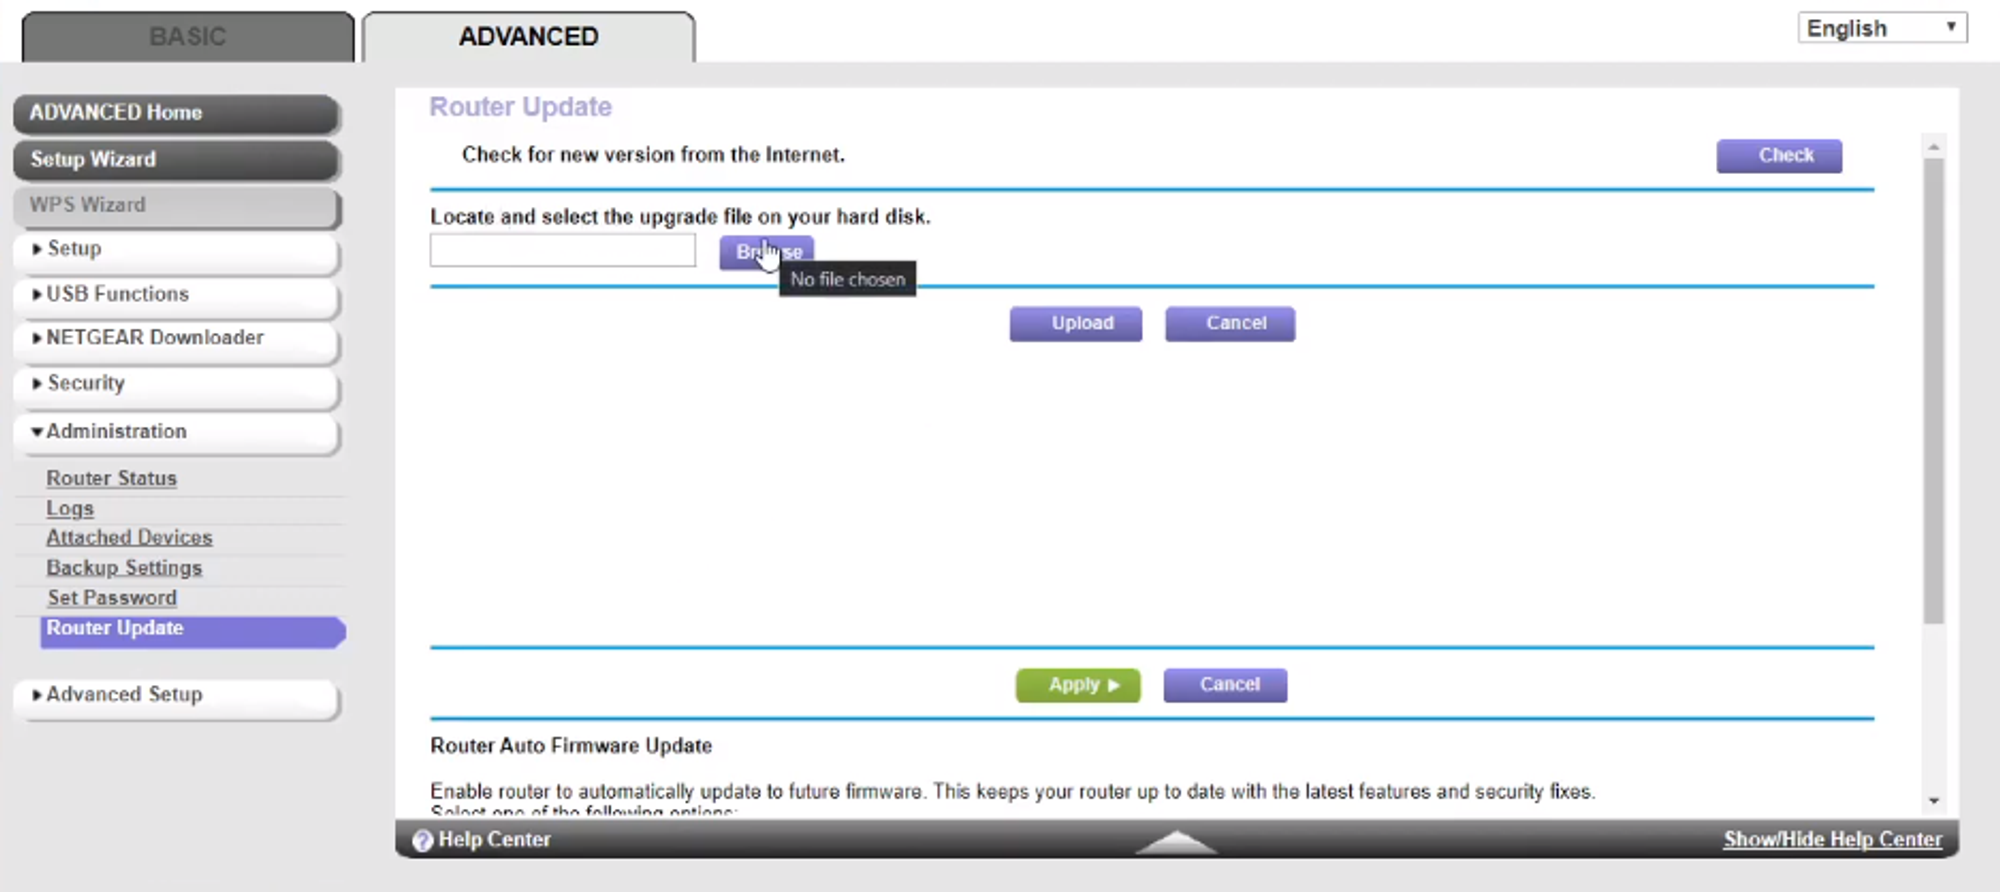
- Go to your route’s update screen (on your router’s admin console)
- Click “browse” on that firmware upload screen
- Select your downloaded file
- Wait for the file to upload and finish installing
- Power cycle your router
- Perform similar steps above when accessing your VPN settings
In cases where your router is WIP (work in progress), you risk making your router inoperable by using it. The same can be said if you try to download the wrong firmware.
If your router is still under warranty, flashing it will void it—so good luck getting your money back if you want to use experimental firmware.
If DD-WRT’s firmware database doesn’t contain what you need, you might try Advanced Tomato. Like DD-WRT, Tomato specializes in providing a better router interface, opening up, and improving your router experience.
If you are nervous about installing the firmware on your router, you have one final choice: virtual routers.
Method #3: Using a Virtual Router
Physical routers are computers that control the flow of internet traffic through your home network. But if your router doesn’t work with VPNs or third-party firmware, your other option is to use your computer.
A virtual router transforms your computer into a router using the software. This can be useful if setting up encrypted connections for gaming consoles. The steps differ between wired and wireless connections.
If you own a
Setting Up a Virtual Router Through Wireless Connection for Apple TV
To start, you’ll need to open and activate your VPN client like normal. The instructions differ slightly depending on your operating system. Here are the steps for a Mac virtual router:
- Go to “sharing” under “system preferences.”
- Select “share your devices from” and select your active VPN connection
- Choose “WiFi”
- Setup a unique network name and password for this mobile hotspot
Here are the steps if you want to use your Windows devices:
- Go to “internet & network” under “control panel”
- Select “mobile hotspot.”
- Select your SSID (network name) and password
- Activate your mobile hotspot
To set up virtual routers on other platforms, you can also check out our steps for Chromecast setup.
If you want to establish a wired connection, it’s a bit trickier.
Setting Up a Virtual Router for Wired Apple TV
If you are old enough to remember setting up a LAN party, you’ve got an idea of how this works. However, the trick is to have a computer with two ethernet ports.
One ethernet port is for connection to the internet, while the second ethernet port is for a link to your Apple TV. If you do not have a computer with two, you won’t be able to solve this problem. You can also choose to share a wireless connection.
All modern Macs only have one, but you might be able to get away with a USB-to-Ethernet adapter. Once you find out where you are getting your second connection, here’s how to establish a wired Mac connection:
- Go to “sharing.”
- Choose “share your devices from” and select your VPN
- Choose “Ethernet”
Because you are working with a wired connection, you don’t need to worry about SSIDs or passwords. If you work with Windows devices, here are those steps:
- Access “network & internet”
- Right-click on your wired connection properties (the one leading to the internet)
- Select “properties” and go to the last tab
- Allow connection sharing
What To Keep In Mind With Virtual Routers
Virtual routers are a great alternative in a pinch, but here are some things to keep in mind when using them:
- Your connection is only as strong as your ethernet adapter will allow
- Your PC’s bandwidth will be taken up by using a virtual router
- Using your PC as a router and a regular router might slow you down
- It’s a bit more complicated than using the smart DNS feature (see option one)
Setting up a virtual router is somewhat like making a sacrifice for your VPN services. Giving up an entire computer can be a pain, significantly if that computer slows your network down.
You can also directly connect your new “router” to the outside world. However, your Windows or Mac firewall settings might not be enough to stay completely protected. Ideally, you should encrypt your regular router over your computer. After all, a standard router is built for protection and translating connections.
Encrypting the Connection of Apple TV+
Apple TV + (plus) is a streaming service exclusively provided by Apple. From the instructions above, you can encrypt your home connections from a virtual or physical router. However, smart DNS settings typically don’t work when encrypting streaming services.
When encrypting Apple TV+, here are your extra options:
Method #1: Setting Up a Manual VPN Connection
When setting up a manual VPN connection, the process is similar to getting OVPN files. In that case, you can either download the file or gather the username and password.
However, the location where you add the connection is unique for the device. Here is how you do this via mac devices:
- Get the OVPN file (or manual connection details)
- Get your router-specific username and password
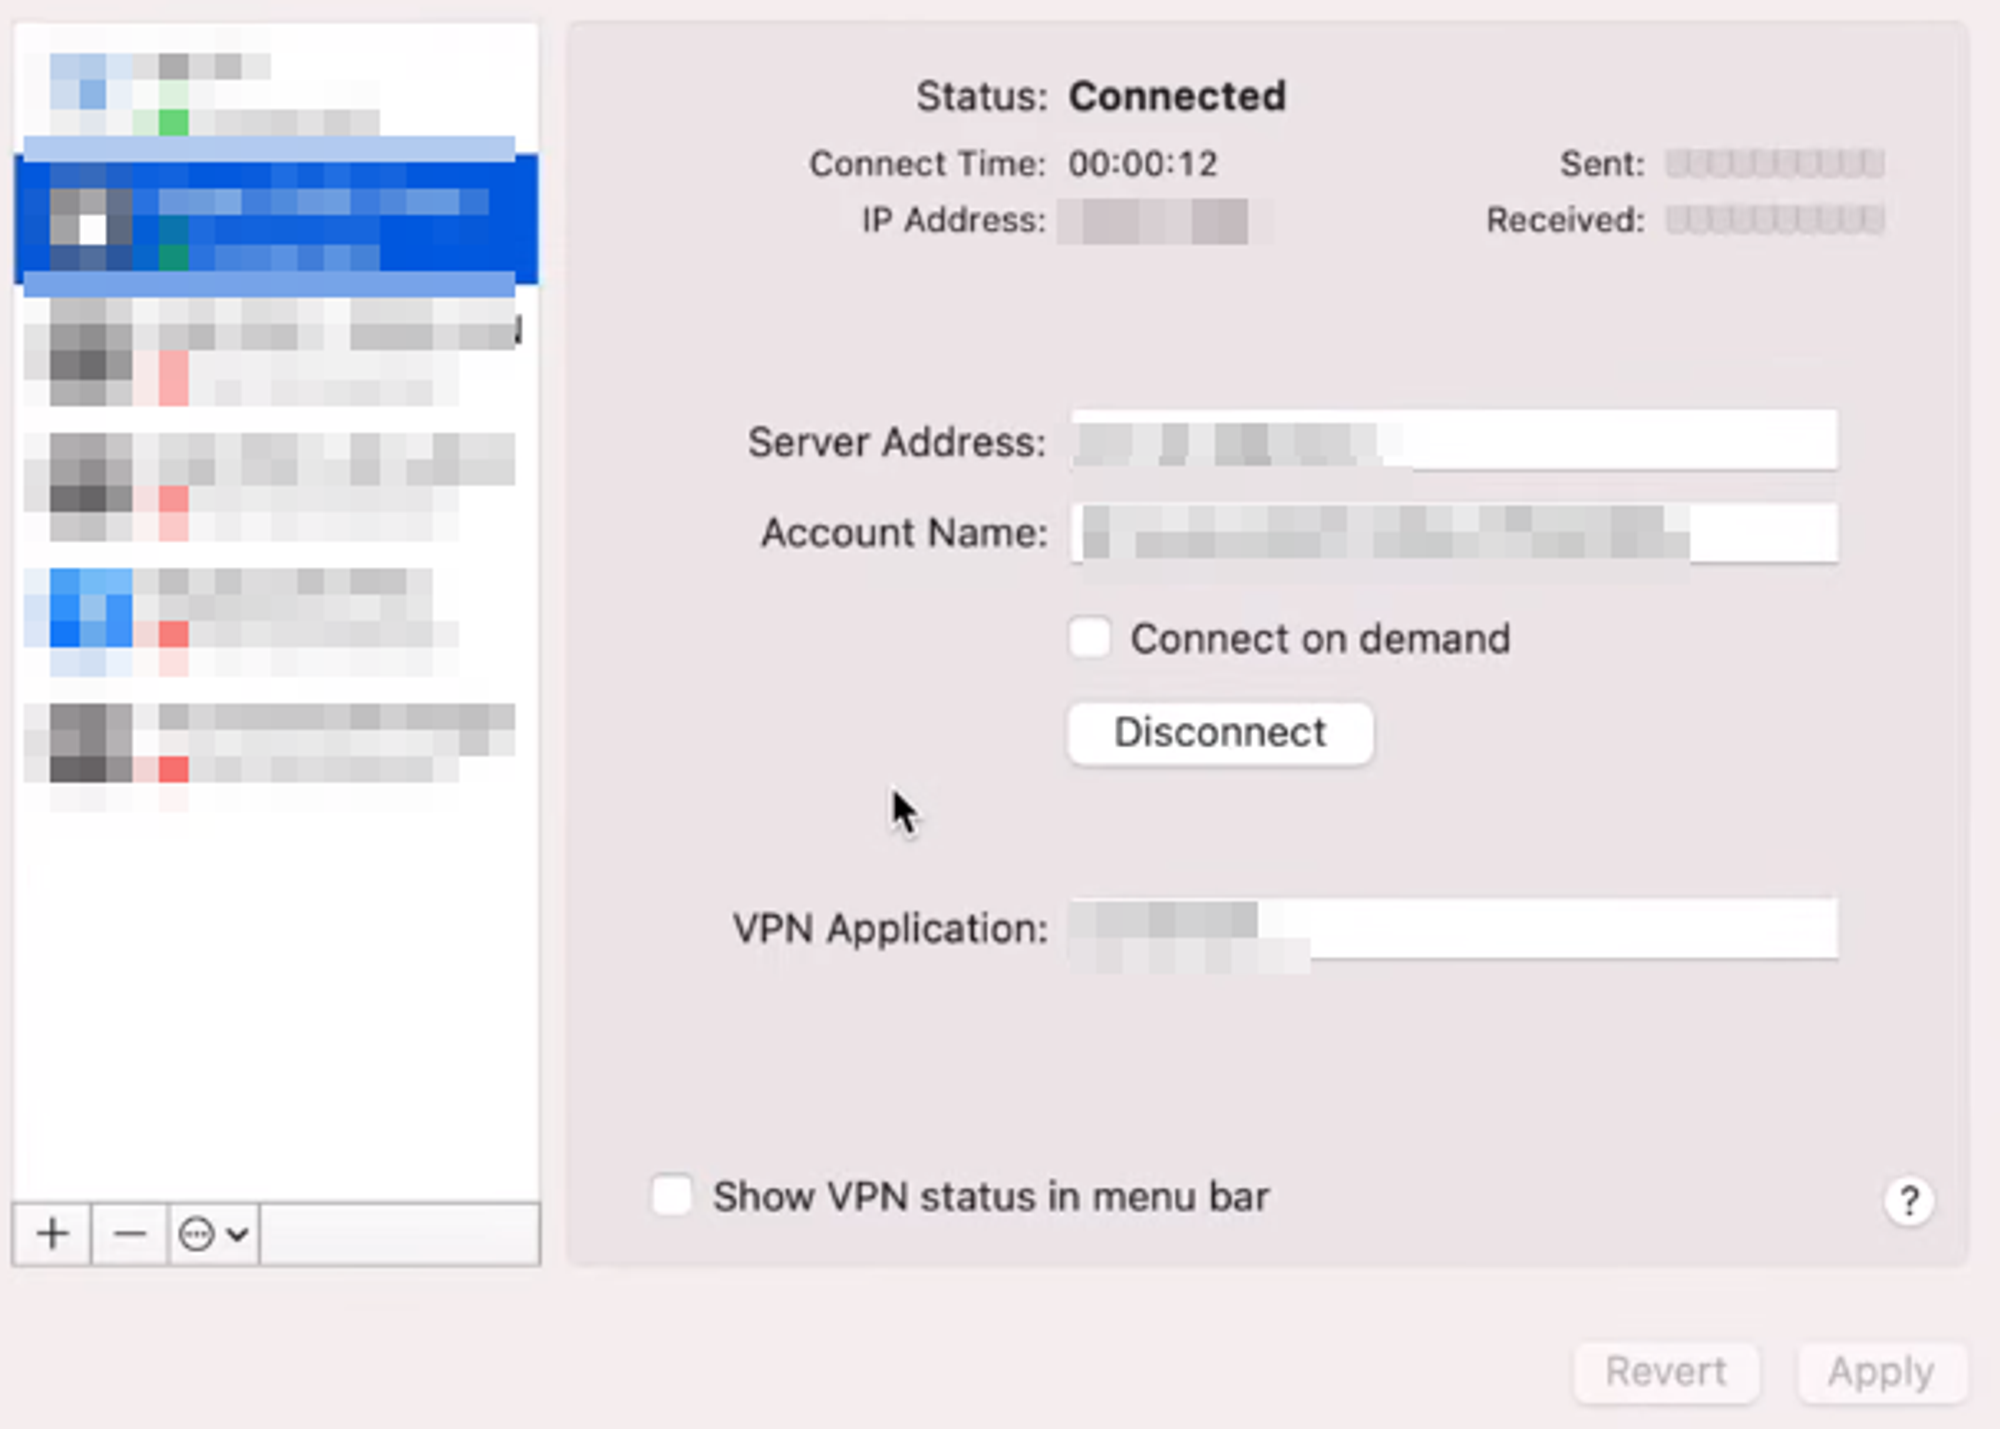
- Go to “general” under “system preferences.”
- Choose “VPN” and tap/click “add VPN configuration.”
- Choose your VPN type (differs based on instructions provided by customer service or the file details)
- Enter login details and keep poxy settings to “auto.”
If you have an iPhone (or any iOS device), the same instructions from above apply. However, Apple devices typically only support IKEv2/IPSec, a specific VPN protocol. If you need to contact your provider’s customer service, mention your device.
Method #2: Downloading a VPN Client
If you have a platform supported by a VPN client (such as iOS or iMac), you can simply download the client. Out of all your options for encryption Apple TV+, it is the easiest. Here are your steps:
- Select your server from the list and tap the “connect” button
- The end
The Fast VPN is the best choice for an Apple-based VPN that hides your data behind military-grade encryption. Whether you are using a mobile device or iMac, it works across all Apple platforms.
Conclusion – Why Do I Need A VPN For Apple TV?
Whether you use a mobile hotspot or wired connection, having a VPN for your Apple TV is an extra layer of security. Any unencrypted connection has a chance to expose information. This information might include your IP address, location, or other pieces of personal data.
By having an active VPN, you can avoid this potential exposure. People like your internet service provider, governments, and hackers can take this data and use it against you.
Besides protective purposes, you’ll find that a VPN also gives you access to geo-locked content. This content is hidden from you based on your location, which is due to draconian laws not recognizing the globalization of society. Whether these laws come from commercialization or government regulation, the system needs to change.
Regardless of why you do this, having a solid VPN like The Fast VPN is a great place to start. To stay protected and ensure you remain secure online, download it today.
Apple TV VPN FAQs
Can You Download a VPN on Your Apple TV?
It would be a lot easier if you could download a VPN client on your Apple TV. However, Apple’s Appstore environment is different from its television platform. So at this time, you cannot download VPNs from Apple’s TV environment.
Will VPNs Slow Down Streaming on My Apple TV?
Because virtual private networks go through a different server, you might experience some slowdowns. However, you can prevent this issue by sticking with nearby servers. Otherwise, advanced VPN protocols (like WireGuard) can help avoid some slowdowns.
Is Apple TV+ The Same as Apple TV?
Apple TV+ is Apple’s streaming service, while Apple TV is apple’s streaming box. So now, the two are not the same thing. To make matters somewhat confusing, you can watch Apple TV+ on your Apple TV.
Will Using a VPN on Apple TV Work for Other Streaming Services?
If you use your Apple TV device to watch Netflix, Hulu, or other similar streaming platforms, these steps apply to all of your services. However, to protect these streaming services from different countries on other platforms, you must encrypt all of your devices.
To save steps, you can follow our steps to encrypt your router. Encrypting your router will apply to all devices across your home network, saving you time.